How Much Does It Cost to Install a Pre-Hung Door?
That’s not including the price of the door.
Purchasing an interior door from Lowe’s or Menards ranges from around $60 – $200, depending on build quality and materials used. The biggest difference is usually if the door hollow or solid core. The wide price range does correlate to a significant difference in quality, so make sure you find the right balance of quality and price for what you’re looking to accomplish.
After you’ve decided which type of door build and quality best fits your needs, you can begin to calculate the budget for your door installation. Type and price of door will allow you the greatest range of selection, but you’ll want to be sure to select a door that will last for many years to come, and will allow you to avoid many common door installation problems.
If you need to hire someone to install your pre-hung door, you’ll need to be circumspect in your search for a contractor. Someone with experience, who has many positive client reviews to call upon will be your best bet. It’s also a good idea to find someone who has been recommended by someone you know personally.
Given the average ranges listed above, it could cost anywhere from $210 to well over $500 to install a pre-hung door. That’s quite a wide range for someone looking to budget and plan a door installation project, especially if there are multiple doors to install.
Install a Pre-Hung Door: Which Method Should I Use?
Installing a pre-hung door can be an intricate process, and getting it right is vital to the function of the door in years to come. Traditional methods for pre-hung door installation require skill and experience for proper installation.
The average contractor can take anywhere from 20 minutes to an hour to install a pre-hung door, depending on many different factors, including correct framing. Given how difficult of a task it can be to master, you’re going to be stuck relying on the experience of the contractor you’ve hired.
It would be a good idea to hire based on cost per door installation, rather than hourly, given the potential time that could be necessary to complete the installation.
Shims are typically used during the installation, and are generally the main cause of the frustration and time consumption.
The difficulty of the installation can also depend highly on having a proper rough opening.
Shimming the Door
First, measure the door and the jambs, and then the rough opening to make sure there is adequate space for the jambs to fit, with room for adjustment.
Second, you’ll have to measure the door rough opening height so you know if the door or frame needs to be cut.
Next, you may need to cut the door 1-2″ from the bottom to allow room for carpet or flooring.
If the rough opening is too short, you’ll cut the door frame to allow it to fit into the rough opening.
Now you can insert the door into the rough opening and begin to shim. The closer to plumb your rough opening is, the easier it will be to shim the door. If the door isn’t fitting plumb into the corners, or is sticking out, you’ll need to push or pull on the opposite corner to get it to fit.
Insert the shims between the door and the rough opening, starting on the hinge side. This will begin to plumb the hinge side and reduce the gap on the lock side. Be sure to insert the shims as close to the hinge as you can.
A good tip is to wedge the top corner of the opposite side of the hinges to keep the door from falling towards the latch side. This is especially helpful if the door is heavy or solid core.
Keep in mind that if your floor isn’t perfectly level, you may need to raise or lower one side of the jamb. This can be accomplished by sliding a shim under the low side or trimming the bottom of the door jamb on the high side.
It’ll take some readjustment to get every side of the door plumb. Keep in mind the impact that decreasing or increasing a gap on either side will have on the the opposite side.

After the Shims Are in Place
- Remove the center screw from the top hinge on the frame and replace it with a 2-1/2” long screw. This can be done on all hinges, but is most important on the top hinge to prevent heavy or solid core doors from sagging over time.
- Install the trim. Make sure shims are not protruding beyond the edge of the drywall as this will cause your trim to not fit tightly against the wall.
- Lightly sand the door to remove any small scratches or smudging caused by handling and shipping.
- Stain, paint or clear coat following any manufacturer’s instructions. To prevent delamination or warping, apply finish to all 6 sides of the door.
Tip: Use an ocillating tool to cut off the shim, or a sharp knife score both sides of the shim before breaking them off.
For more tips, you can check out our guide on shimming a door.
If this seems like a time consuming and frustrating process just for a basic pre-hung door installation, that’s because it is. Using shims to install doors is an outdated method that has been resistant to change in the construction industry for far too long.
That’s why we invented EZ-Hang – a simple door installation system that increases speed and efficiency for anyone, at any skill level.
An Easier Door Installation: EZ-Hang
By using this bracket system instead of shims, a person of any skill level can easily install a door in around 5 minutes. That’s 5 times faster than the average door installation using shims.
EZ-Hang not only ensures efficiency, but also strength and a perfectly plumb door every time. A seventh bracket means that it’s just as simple to level the top of the door jamb, as it is the plumb the sides, with almost no adjustment needed.
With shims, you need make sure that they get properly cut and broken, and level with the frame so the trim lays flat. But with EZ-Hang, the trim fits right over top of the bracket. There’s no adjustment or cutting necessary.
The patented adjustable slots in the EZ-Hang brackets also make them far superior to shimming when dealing with tricky rough openings – for example, in an older house. Trimming a door with even a slightly “off” rough opening can lead to what seems like a high wire balancing act.
Now let’s take a look at exactly how to use these easy door installation brackets.
How to Install a Pre-Hung Door: EZ-Hang
Lets take a look at how to install a door with EZ-Hang:
Door Installation Has Never Been Easier
- Install 5X Faster
- Eliminate Shims
- Perfect Fit Every Time
Step 1
Step 2
Step 3
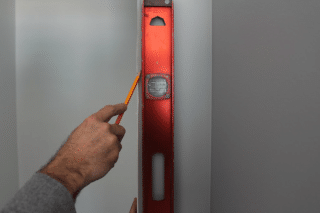
Draw a plumb line on the wall
Using a level, draw a plumb line on the wall, about half of an inch from the rough opening.
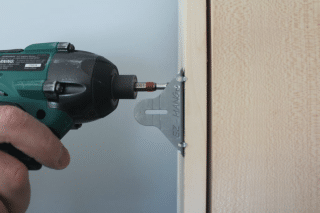
Attach the brackets to the frame of the door
Screw brackets to back of door frame using the 1/2″ screws provided, below each hinge and even with the edge of the door frame. Repeat on the knob side of the door and the top jamb.
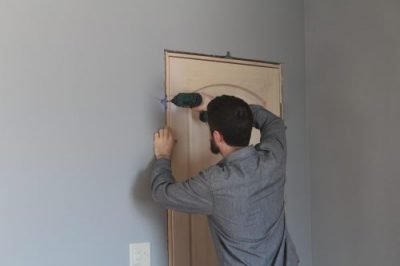
Hang the door in the frame
Starting at the top hinge, match up one of the lines the bracket with the level line drawn in step one. Screw the door to the wall using the drywall screws provided. Work your way down the hinge side of the door.
Step 1
Draw a plumb line on the wall
Using a level, draw a plumb line on the wall, about half of an inch from the rough opening.
Step 2
Attach the brackets to the frame of the door
Screw brackets to back of door frame using the 1/2″ screws provided, below each hinge and even with the edge of the door frame. Repeat on the knob side of the door and the top jamb.
Step 3
Hang the door in the frame
Starting at the top hinge, match up one of the lines the bracket with the level line drawn in step one. Screw the door to the wall using the drywall screws provided. Work your way down the hinge side of the door.

EZ-Hang VS. Shims
Next, we’ll take a look at a comparison for using EZ-Hang vs the traditional method of shims for installing a pre-hung door. Given that they are similar in price, the option to use EZ-Hang brackets is
Not only do EZ-Hang brackets give the same stability as shims,
The average door installation time using shims is between 20 and 30 thirty minutes for a skilled contractor, but with EZ-Hang, that number drops to just 5 minutes, for anyone at any skill level.
One of the other major benefits of these door installation brackets is that installing a pre-hung door can be done by one person since you can complete the entire job from just one side of the door. This also means that your depth is automatically set at the face of the door.
Another benefit is that with the EZ-Hang installation brackets, there’s no face nailing through the jamb of the door. This makes for a professional looking finish and eliminates the time and mess spent filling nails holes or painting the jamb.
With shims, it’s often recommended for two people to install the door since you have to balance the frame in the rough opening and keep it plumb from both sides.
EZ-Hang
- Hang a door in 5 Minutes
- Work from one side of the door
- No experience required
- Trim fits perfectly over bracket
- Hang a door by yourself
- Patented easy adjustment
Shims
- Average install time 20-30 min.
- Must move back and forth
- High learning curve
- Shims must be cut perfectly
- Requires 2 people
- Constant readjustment required
Thousands of satisfied builders and homeowners have already begun utilizing EZ-Hang. After experiencing the time and money savings, there’s no reason to ever go back to shims.
The short video below demonstrates just how quick and easy you can learn how to install a pre-hung door using EZ-hang door installation brackets.