
Exterior Door Installation Instructions
Exterior door installation often requires slightly more care and attention than interior installations. Using EZ-Hang simplifies this process as much as possible, allowing for the same frustration free process, with exterior door installation as you’ll find with interior doors. Learning how to install an exterior door doesn’t need to be a difficult process.
Things you’ll need:
- Pencil
- Level
- Drill
- EZ-Hang Brackets
Step 1: Verify your door fits the rough opening by measuring the height and width. You will also need some adjustment space to level and square the door. Remove the door’s packaging and look to see if the manufacturer added a door retainer in the lock-set hole. These are there to keep the door from swinging open during transit, also they often hold the door squarely in the frame.
If possible, leave it in during the installation. Just make sure you know how to remove it prior to installing the door, as not all of them can be removed once the door is in the hole. Draw a plumb line in the interior of the building, on the side of the wall where the hinges will be.
This may be a good time to pre-drill holes in the exterior brick moulding if there is not a nailing fin on the door. You should be using galvanized nails or trim screws, so size your holes accordingly to your fastener.

- The level bubble must be exactly in the middle of the lines.
- Draw this line on the inside of the building where the hinges will be.
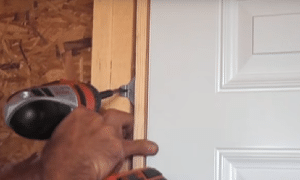
Step 2: Next, attach the EZ-Hang brackets to the back side of door jambs with the 1/2″ screws. Attach 3 brackets just below each hinge, and 3 on the latch side. These should be placed about 6-8″ down from the top, one in-between the door latch hole and deadbolt bore (if you have one) and one about 8-10″ up from the bottom. The remaining bracket gets installed on top of the door in the center.
This helps add strength to the installation and allows you to set the door’s reveal properly.
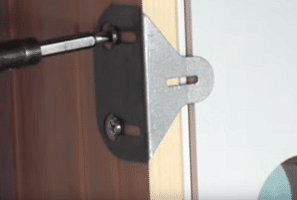
- Use the single (drywall already installed) or double arrow (no drywall) to properly place the screws.
- Face brackets in or out when placing the screws, they get removed and re-installed after the door gets set.
- The brackets act as template to get the screws in proper position. Use a screw driver and just slightly loosen the screws and pull forward until the screw head is at the keyhole slot opening. Remove all 7 brackets in this manner.

- Slightly loosen the screws just enough to remove the brackets.
- Brackets will get re-installed after the door is set.
Step 3: Next, you’ll need to check the sill for level. If the floor is not perfectly level, and the door sits on an un-level floor it will be impossible to end up with a square door installation. Prepping the floor to make it level if it’s not, is a critical step in making the process go smoothly. Prepare the sill with a sill guard for the best water intrusion protection.
Just caulking under the threshold will eventually break down and could leave the door and structure vulnerable to rotting. It is no longer a best or recommended practice. Seal around the door’s perimeter by caulking either directly behind the exterior trim where it meets the wall or on the wall itself where the door trim will make contact when installed.
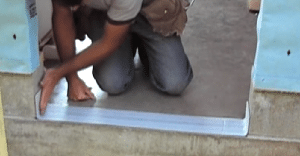
- Don’t rely on just caulking, use a sill protector.
- Make sure the sill is level – the door threshold must sill on a level surface shim if needed.
Step 4: Now you’re ready to set the door in the opening. This should normally be done with two people, due to the weight of the door. You can temporarily fasten the door in place, just to keep it from falling. Usually, one or two screws or nails are sufficient. One of the two installers can also hold it in place from the exterior.
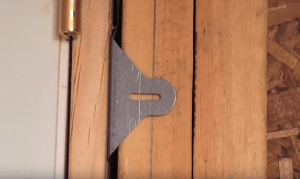
One installer will need the EZ-Hang brackets on the inside of the door. Replace them over the screw heads in
Working your way down the door, finish the remaining hinge side brackets by screwing them into the wall, taking care they are all using the same reference line.
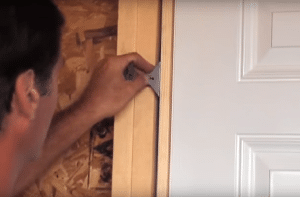
- Re-install all 7 brackets over screws previously installed.
- Take care the door is temporarily fastened or someone is holding it in place from the exterior.
- The EZ-Hang brackets can be used in exterior door installations with or without the interior drywall attached.
- Start at the top hinge bracket and work your way down the door.
- Use the same line for each hinge bracket.
- The door should have equal space and be square with the doors frame.
- Easily adjust the door reveal with each bracket.
- After all the brackets are attached, fasten the door at the exterior with trim screws.
- Apply low expansion door and window spray foam between the frame and wall cavity.
- Install desired trim over the brackets.
Step 8: Finally, install a long 2-1/2″ screw (usually provided by the door manufacturer) through a center hole in the top hinge nearest
Optionally, you can add a shim behind it to avoid over-driving. The final step would be to insulate the perimeter and install any lock set and deadbolts.

- The long screw must go into the wall framing.
- Don’t over tighten the screw as it may pull the door out of square.
- Long screws can be installed at each hinge, but the top is critical.
- Most manufacturers include the screw or screws with the door.