
How to Install an Interior Door
Installing an interior door is a simple and straightforward process that can be done by a homeowner with no prior experience, as long the right tools are used, and the proper steps followed.
EZ-Hang offers the quickest and easiest method for interior door installation available. With EZ-Hang, there’s no need for shims, which dramatically reduces the time necessary for an interior door installation, while simultaneously increasing accuracy, ensuring a perfect fit every time.
Below, you will find a step by step guide for installing an interior door, along with a video demonstration.
Interior Door Installation Instructions
What do I need to install an interior door?
- EZ-Hang Installation Kit
- Level
- Pencil
- Drill or screwdriver
Step 1: Draw a Plumb Line
Using a level, draw a vertical plumb line on the drywall 1/2″ in from the rough opening. This line must be on the hinge side and in the room the door swings in to.
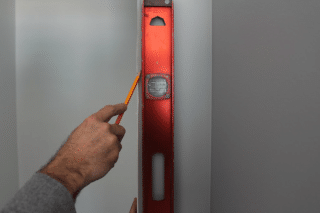
- The line does not have to be exactly 1/2″ from the rough opening, but its’ important that it’s plumb. This line, if drawn properly will allow you to only have to use your level once, instead of constantly picking it up to check the door for plumb and level.
- Make sure the bubble is directly in the center of the lines on the level. Once the line is drawn on the wall, it will give a representation if the wall is not plumb or your rough opening is not correctly sized.
Step 2: Attach the Brackets
Screw brackets to back of door frame using the 1/2″ screws provided.
Install brackets below each hinge and even with the edge of the door frame. Repeat on the knob side of the door, starting 12″ down from the top, 2″ above the latch hole and 6-8″ up from the bottom.
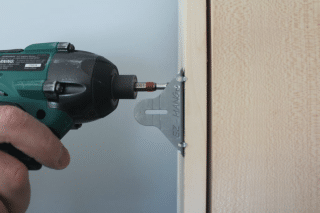
The final bracket is for the top, it is a pivotal bracket whose accomplishment is two-fold:
- First, it allows the installer to easily remove any bow in the top jamb. These jambs are almost always crowned up due to the weight of the door resting on the side jambs from factory to job-site.
- Secondly, it adds structural strength to the installation itself by inhibiting the side jambs from moving side to side. This is particularly important as the weight of the door is constantly “pulling” on the top hinge.
- The door is now ready to insert into the rough opening. Always measure the opening prior to setting the door to verify the height and width will allow the door to fit, along with some adjustment space.
- Add 3/8″ or 1/2″ blocks under the door if you will be installing carpeting on the floor. This will allow space for the carpet to be tucked under the jambs. It will also provide some adjustment if the floor is not perfectly level.
Step 3: Install the Door
Starting at the top hinge, match up one of the lines the bracket with the level line drawn in step one. Screw the door to the wall using the drywall screws provided.
Work your way down the hinge side of the door, making sure to use the same reference line for each of the 3 hinge brackets.
There are two lines on the brackets, be sure to use the same line for all the brackets on the hinge side.
Next, check the clearance between the frame and the door on the top and knob side. Take care to make sure they are equal.
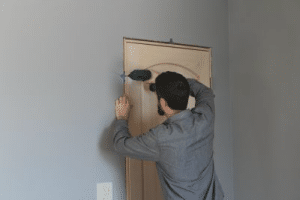
- Starting at the top again, continue working your way down the door. Be sure to glance at both upper corners where the door meets the jambs. These should be equal; If not, and you and sure the door is perfectly plumb, you may need to raise or lower one side of the jambs to adjust the discrepancy.
- Keep the clearance between the frame and door equal, as you screw the door to the wall with the drywall screws.