How to: Install a Pre-Hung Exterior Door
Depending on the weight of the door and strength of the individuals installing the door, you may want more than two helping with the installation.
You can see all of your different options for choosing what type of door you want to install by going to Lowe’s, Menards, or your local building supply store.
Getting Started
Depending on whether you’re replacing an existing door or installing a one in a new house, you made need to take a couple extra steps. Luckily, using EZ-Hang brackets makes the process much simpler than using shims.
If you don’t need to know how to remove a door and are ready to begin the installation, you can skip this part.
Removing an Exterior Door
You’ll also want to measure the door itself as well.
Be sure to write these measurements down. You’ll need them to ensure that the new door you select will fit correctly.
The new door should be 3/4 of an inch less wide than the rough opening and 1/2 inch less in height.
- Remove the Doorbell
- Remove the Trim
- Remove the Door
- Remove the Jamb
For further detail on removing a door, check out our post on replacing a door.
Installing a Pre-Hung Exterior Door
- Pencil
- Level
- Drill
- EZ-Hang Brackets
Step 1
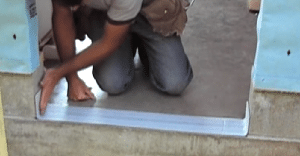
Check the floor for level, and install a sill guard. Never rely on caulking alone.
- Be sure to run the guard up both sides of the rough opening.
Step Two
Remove packaging from the door and see if the manufacturer added a door retainer or transport plug in the lock-set hole. These are there to keep the door from swinging open during transit, and they also help hold the door squarely in the frame.
If possible, leave this in while completing the installation. Just make sure you know how to remove it. Some types can’t be removed after the door is installed, and must be done prior.
Draw a plumb line in the interior of the building, on the side of the wall where the hinges will be.
- Draw the line about 1/2 from the rough opening
- Make sure the line is perfectly plumb
This may be a good time to pre-drill holes in the exterior brick-moulding if there is not a nailing fin on the door. You should be using galvanized nails or trim screws, so size your holes accordingly to your fastener.

Step Three
Pre-drill holes in the brick-moulding.
- These holes will be for trim screws or finishing nails.
Step Four
Attach the EZ-Hang brackets to the back of the door jambs using the 1/2 inch screws provided. Three brackets go just below each hinge, and the other three go in the relative spots on the latch side.
This is about 6-8″ down from the top, one in-between the door latch hole and deadbolt bore (if there is one) and one about 8-10″ up from the bottom. The last bracket goes on top in the center of the door.
- When attaching the brackets, use the single arrow if drywall is already installed, or the double arrow if it isn’t.
- Attaching the brackets at this stage acts as a template for determining where the screws will go.
Now you’ll need to remove slightly loosen the screws, allowing enough space for the brackets to slide, and remove the brackets.
- The brackets will be permanently attached after getting the door in the rough opening.


Step Five
Caulk the perimeter of the opening and set the door.
- This usually requires at least two people
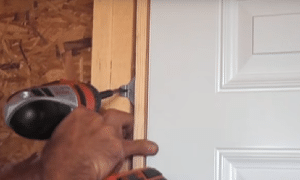
Plumb the hinge side, using a level, and screw through the previously drilled holes in the moulding to hold the door in place.
<br
- Don’t fully tighten the screws in case adjustment is needed.
Step Six
Now you’re ready to attach the EZ-Hang brackets. Slide the brackets over the screws so that the slider holes in the brackets line up.
- Push forward until the bracket stops against the wall.
Check the plumb line that you drew on the wall, with the reference line on the brackets.
- All the brackets on the hinge-side should align with the bracket’s reference lines.
- Screw the included drywall screws through the brackets and into the wall studs.
- Check the door clearances and adjust as needed as you attach each bracket.
Step Seven
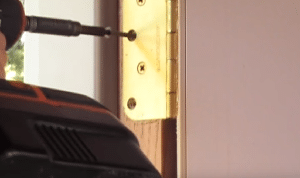
Remove the top hinge screws and replace with 2 1/2 inch screws to go into the wall studs.
- This gives added stability and keeps the door from coming loose over time.
- You can also add a shim behind the hinge to avoid over-driving if you would like.
The last step is to insulate the perimeter and install any locksets or deadbolts.
Door Installation Has Never Been Easier
- Install 5X Faster
- Eliminate Shims
- Perfect Fit Every Time