How to Lay a Brick Patio
Building a backyard patio out of brick pavers can be a relatively inexpensive way to increase the functionality of your yard and make it more aesthetically pleasing. This is also a project that can usually be a DIY project, depending on the size of the patio you’re after.
By following a few simple principles and using the right materials, you can be on your way to a better backyard, driveway, or front porch. When done and maintained correctly, a brick patio should last far longer than poured cement or a wooden deck.
Tools Needed:
- Rake
- Hose
- Shovel
- String Line
- Chalk Line
- Level
- Tamper/Compactor
Materials Needed:
- Brick Pavers
- Gravel Paver Base
- Sand
- Polymeric Sand
- Landscape Fabric
Preparing the Ground
You’ll start by preparing the ground where your patio will be. Do this by first using your string and squaring off the area. Make sure the area is square, or the pavers won’t edge properly. If you’re making a circular patio or any other shape, you can use spray paint or even a garden hose to lay out the area.
After you have the area properly laid out, you’ll need to dig the ground, about 8 inches down. This will enable the bricks to sit at the correct level, just above the ground.
If your patio will share a border with a wall on your house, or be near the house, you’ll need to ensure that the patio is on a slight angle away from the house to allow for proper drainage.
Enabling Drainage
To do this, you can make the base about 1/2 inch higher on the end that you’ll need the water to drain away from, and 1/2 inch lower on the end it will drain towards.
you can do this by using a stake and tying a string across each end of the strings you made for the border, then measure down. Then use your level to get the proper slope across the area.
At this point, it’s okay if you don’t get the angle perfect. You’ll be able to make adjustments when you add the layer of sand. However, the closer you get now, the easier it will be.
After you have the area for the foundation prepared, go over it with the compactor to keep it in place as you add the layers of gravel and sand.
Laying the Foundation
The most important part of laying a brick patio is to make sure you get the foundation correct. Without a proper foundation, the bricks will become uneven and sink into the ground in much less time than with a proper foundation.
A proper foundation will consist of about 6 inches of gravel paver base and 1 inch of sand. The polymeric sand will be swept in between the the cracks and hold the pavers in place. The gravel is what keeps the foundation level.

Step 1: Lay the Landscape Fabric
Start by laying your landscape fabric on the ground. This will prevent any grass or weeds from growing up in between your pavers.
Step 2: Set the Gravel
Now you’re ready to begin filling in the gravel. Remember that you’ll need about 6 inches of gravel and that you’ll need to maintain your angle for drainage.
Rather than adding all 6 inches at once, you’ll want to add the gravel in layers of about 2-3 inches. After each layer, wet and compact each layer. This will not only allow the gravel to compact better, but will also make it easier for you to maintain the proper drainage angle.
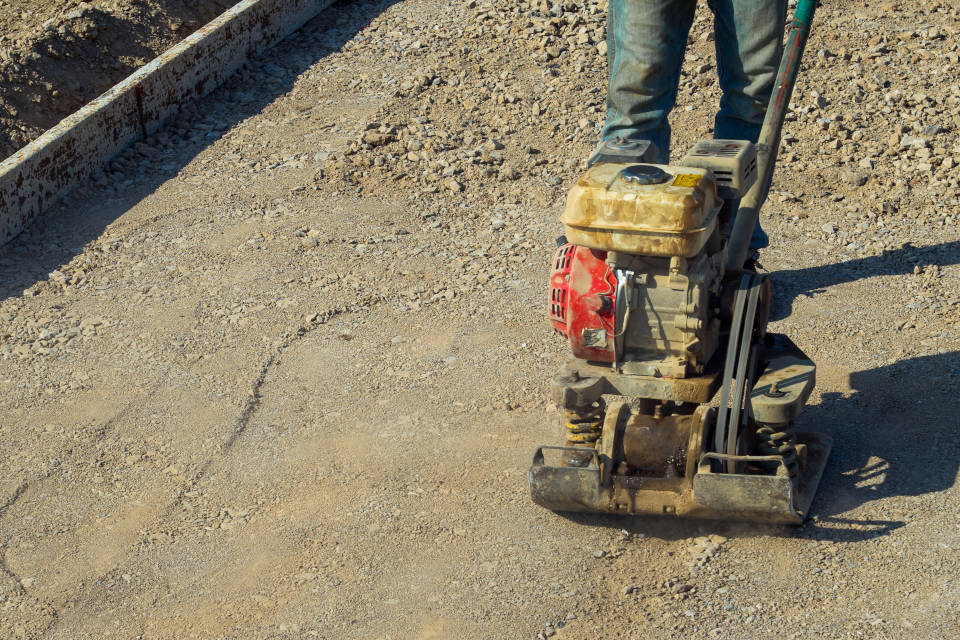
photo: inch calculator
Step 3: Add the Sand
Next, you can add the layer of sand. Since this layer will only be about an inch thick, so you can add the entire layer at once.
This is the step where you’ll need to ensure that the slope of your foundation is exact and that the ground is perfectly compacted. To do this, you some type of screed to flatten out the sand, checking for level periodically.
Next, you’ll compact the sand and make sure there aren’t any soft or low spots.
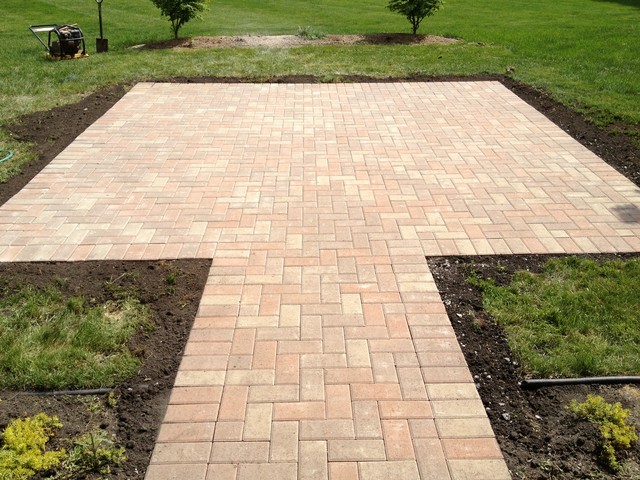
Laying the Patio
Now you’re ready to begin laying the bricks. There are multiple ways to approach this step, you’ll need to select whichever approach best fits your situation.
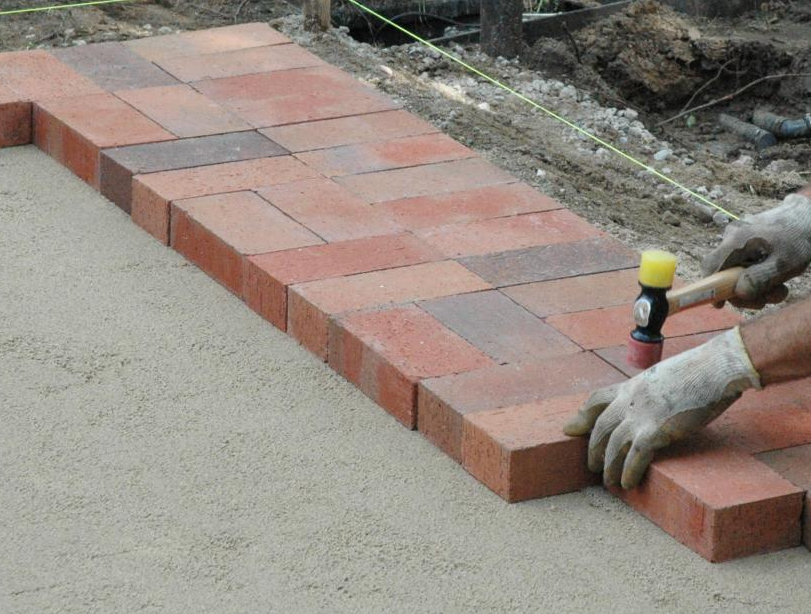
Option 1: Start with the Border
The first option is to start with the border around the area of the patio. This works best if you are using a different type of brick or paver for the border, or if you’re making a circular patio.
Option 2: Start at One End
This option will be best if you’re using square pavers only, or if you’re only using one type of brick. This will allow you to maintain level throughout the laying process, and plan out exactly how many bricks you’ll need and where they’ll end up at.
Wherever you choose to start, the process will be the same.
How to Lay the Bricks
Now you’re ready to begin laying the bricks. First, you’ll need to decide what type of pattern you’ll be following, and plan out the layout.
Start at the edge and begin setting the pavers in place. After each one, tap it with a rubber mallet to make sure it stays in place. You’ll want to put the pavers right next to each other, as close as possible.
Set the pavers in place from the top. Be sure not to slide them into place or it will disturb the layer of sand.
After you get one row completed, run a string across the end of the row to check if the bricks are all in a straight line, and adjust accordingly.
Repeat this process for each row. Be sure to check that the row is straight, using your string each time. Also check for level to ensure the proper grade as you go along.
How to Keep Patio Bricks from Moving
After the patio is all laid in place, the final step will be to ensure it stays that way. This is where the polymeric sand comes into play. Polymeric sand is sand that contains additives specifically to hold pavers or bricks in place.
To do this, you’ll need to cover the patio with the polymeric sand, then sweep it between the cracks of the bricks. You may need to do this a couple times in order to fill each of the joints.
After the joints have been properly filled, you’ll need to lightly rinse the patio with water. The purpose of this is it to get the sand to solidify in the joints, along with get any sand off the top of the patio.
If sand is left on the patio, it may cause some residue to remain on the top. You can also squeegee the the patio after rinsing to make sure this doesn’t happen.
Just make sure that you are lightly wetting the patio and not washing out any sand from between the joints.
After the bricks are all set in place, you can either frame the patio with aluminum framing, or move dirt back around the edges and plant grass.
Here’s a video from Techniseal on how to use polymeric sand:
Door Installation Has Never Been Easier
- Install 5X Faster
- Eliminate Shims
- Perfect Fit Every Time